Introduction
Printing marketing materials sounds like the simplest of tasks: supply images, copywriting and pass them onto your agency to print. Simple… but sometimes can still be tricky!
Creating powerful marketing assets cannot be done without sincere effort to produce high-quality materials. This responsibility is both on businesses and their marketing agencies.
Nothing will ruin your printed brochure quicker than supplying a low-quality logo or image. When a hard copy brochure is produced with poor-quality graphics, it’s ineffective, pixilated and does your brand a serious injustice. And it’s not exactly your fault. Your agency can guide you to make sure you can do it right.
Thankfully, solving this problem is not difficult, we’re here to help!
This guide breaks down exactly what we need to provide you with the best quality printed outcomes.
Step 1
(Learn how you’re printing the document)
Before you provide assets, you need first to understand how your brochure will be printed – this will impact the file sizes/quality you’ll need. There are two main types of printing to understand – Lithographic (Offset) Printing and Digital Printing. Let’s go into more detail.
Lithographic (Offset) Printing
Most businesses will have used this type of printing before. It’s the traditional way of printing and the most common.
Offset printing technology works with plates, usually made from aluminium, used to transfer an image onto a rubber ‘blanket’, which is then rolled onto a sheet of paper.
The name offset relates to how the ink is not transferred directly onto the paper (because it’s transferred to the rubber ‘blanket’ first). Because offset presses run so efficiently once set up, offset printing is the best choice for larger quantities. It provides accurate colour reproduction and a crisp, clean and professional result.
The pros
- Exceptional quality
- Perfect for high-resolution graphics and photographic images
- Large quantities can be printed cost-effectively
- The more you print, the cheaper the price per piece
- More ink choices, including Pantone, colour matching and metallics
- More paper sizes and types with custom finishes can be used
The cons
- Equipment set up takes some time
- Ink takes a while to dry; therefore, the collection is not available immediately after printing
- The cost of setup is not cost-efficient for smaller print runs
Digital Printing
Digital printing has come a long way. Given the improvement of quality over the years, it is now a viable option for producing high-quality marketing assets.
Unlike offset printing, digital printing doesn’t use plates. Instead, it uses either toner (like in laser printers) or liquid ink (in larger printers).
The pros
- Screaming fast output thanks to no setup or drying time
- Small print runs are low cost
- Easy to personalise prints (names, addresses, codes, or numbering can easily
be added) - Print only the amount you need, when you need it
- Lower minimum quantities (as low as 1, 20 or 50 pieces)
- Inexpensive black and white digital printing
- Improved technology has made digital quality acceptable for more uses
The cons
- Larger volumes work out less cost-effective than offset printing
- Although today’s digital printing technology provides a high-quality result, in most cases it still isn’t quite as good as offset printing
Artwork Checklist
Lithographic (offset) printing
- Final files need to be at 300ppi @ 100%
- 5mm bleed all round minimum*
Digital printing
- Digital printing, including Indigo, should use files at 150ppi @ 100%. 100ppi is acceptable.
- 5mm bleed all round minimum*
*5mm bleed all round minimum is only relevant if you are providing the artwork. If we are creating the file, we do this for you.
Step 2
(Understand Image Quality)
Many people still believe an old falsehood that bigger file sizes equal more pixels. This is not true. Today, image compression can reduce the file size without changing the number of pixels.
Instead, you need to look at the actual pixel dimensions to understand how big an image is.
It’s the 1500px x 1000px dimension that is the most important, not the 2.37MB.
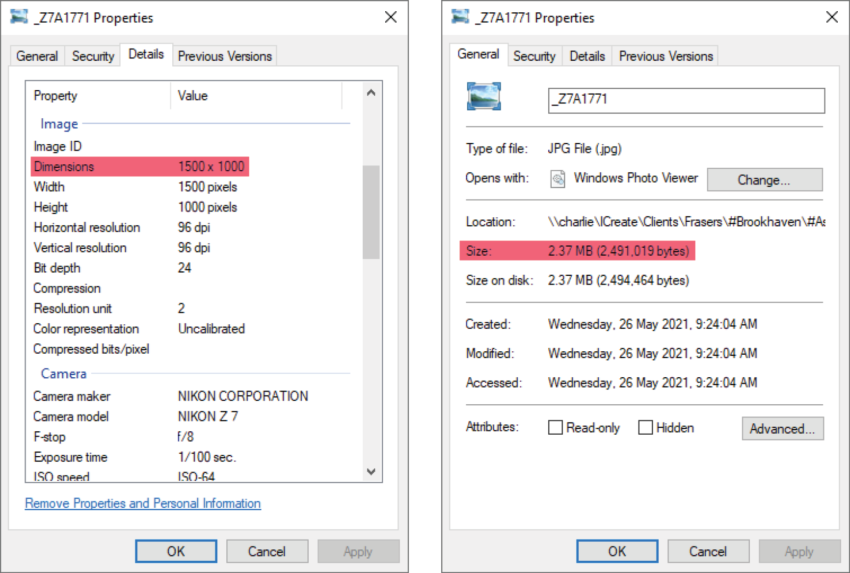
Using the example above, if we divide the dimensions by 300, that’s the largest size in inches we can reproduce artwork (without sacrificing quality).
1500px / 300ppi = 5in (127mm) • 1000px / 300ppi = 3.3in (~84mm)
At 127mm x 84mm, this would only be suitable for a small infill image on the page.
So, how big should your supplied images be?
Let’s use an A4 brochure full page hero image as an example.
That’s 210mm wide x 297mm high.
You just need to work back the other way
210mm = 8.26in
297mm = 11.7in
8.26in x 300ppi = 2478px
11.7in x 300ppi = 3510px
So the image you supply should be a minimum size of 2478px wide x 3510px high
With this calculation, it’s easy to determine what size you need. And whether an existing image can be used based on those calculations.
Standard Image Sizes
Below are some standard page sizes that you can use as a reference guide.
Offset Printing = 300 ppi • Digital Printing = 150 ppi
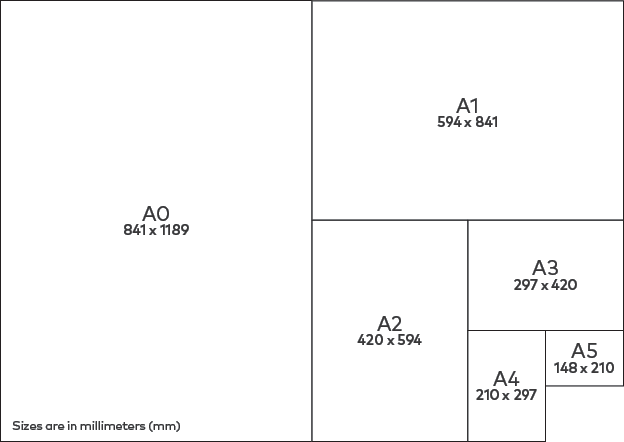
A4 – portrait
(297mm x 210mm): 2478px x 3510px
A3 – A4 portrait double page spread
(297mm x 420mm): 3510px x 4960px
A2 – A3 portrait double page spread
(420mm x 594mm): 4960px x 7015px
Oversized A4
(250mm x 350mm): 2952px x 4133px
Oversized A4 double page spread
(500mm x 350mm): 5905px x 4133px
Step 3
(Supply the Best Logos and Graphics)
Where possible, all logos and graphics should be supplied in .ai or .eps vector format. This will ensure the logo/graphic can be used at any size or scale and placed as a transparent image on backgrounds.
If it’s not possible to source an .ai or .eps vector of your logo or graphic, you can supply a .jpg/.jpeg file. However, this comes with a disclaimer: We do not recommend .jpg files as they are very limited. They don’t scale well, and they have a white background as part of the file. This translates to poor quality and limits the way the logo can be applied to a page.
Image Quality for Renders (Artist Impressions)
A good default size would be 6500px to 7000px wide.
If you’ve commissioned renders, these are usually supplied at 5000px wide. Based on our formula, this is just enough for an A4 double-page spread.
Renders can be supplied at any file size you choose. However, we recommend making them larger as it provides more flexibility for use on larger full-page image spreads, big sales display walls or signage such as billboards down the track.
Larger file sizes often incur a small fee because it takes longer to render on your architectural render company’s computers, but it’s negligible compared to the benefits.
See this blog article for more details
Summary
Both offset and digital printing processes have their place depending on your brand’s target audience and the use of the material you’re producing. Whichever printing process you choose, supply your agency with the correct image sizes from the start to ensure timely, high quality printing. We’re here if you have any questions!
Final files at 300ppi @ 100% are the secret to winning printed assets.
Glossary of terms
Bleed
When pages or sheets of paper are printed, a margin is trimmed in the final process. Bleed refers to that area to be trimmed off. Artwork can sometimes extend into that bleed area, so it’s important to have a 5mm bleed all around to avoid disruption to the graphic.
Indigo
Indigo refers to the HP Indigo printing process, which matches offset printing in quality and application versatility while being able to print on a larger range of materials. Instead of toner, Indigo uses Liquid Electrophotography (LEP), electrostatically charged inks and a heated transfer roller to melt the charged ink particles before applying them to paper. It’s essentially the middle ground between lithographic printing and digital printing, boasting the benefits from both.
PPI (Pixels Per Inch)
PPI stands for Pixels Per Inch and it is the only measurement that matters when selecting an image that will be suitable for printing. This size is fixed and is not linked to the disk file size of an image.
.ai or .eps vector format
An .ai or .eps file is basically the same; except that AI files are a proprietary vector type created by Adobe, which is only able to be created or edited with Adobe Illustrator. The benefit of .ai or .eps is that they are vectors and can therefore be expanded to any size without distorting or pixelating. They can be reopened and edited, unlike .jpg.
.jpg/jpeg format
JPEG or .jpg is a format that reduces sections of the image into blocks of pixels using a compression algorithm. Originally used for digital photography, JPEG essentially just translates images into blocks of pixels. Unlike .ai or .eps, these images can’t be reopened and edited. Thus, it’s a very limited format.

